

Whether you need engineering know-how, top-notch design chops, or a strategy boost, DockYard can help. Book a free consult today to learn more.
Today, we’re going to talk about utilizing slots in Svelte, and focus on combining two aspects of it: slot forwarding and slot props. Slots themselves are part of the Web Components technology suite, which serves as a placeholder element you can fill with your own content. Slot forwarding in Svelte is a great way to pass the content for the placeholder through components to render in their child components.
Slot Forwarding
At an overly simplistic level, slot forwarding looks something like this:
<!-- Parent.svelte -->
<Child>
  <div slot="theSlot">
    My slotted content
  </slot>
</Child>
<Child />
<Child />

<!-- Child.svelte -->
<Grandchild>
  <slot name="theSlot" slot="otherSlot" />
</Grandchild>

<!-- Grandchild.svelte -->
<slot name="otherSlot" />
In the example above, the <Parent /> component renders three instances of the <Child /> component, but only one needs some custom or extra content. The slotted content passes through a wrapper slot in the <Child /> component, and renders within the <Grandchild /> component. It may seem to make more sense to directly render the <Grandchild /> component within the <Child /> component, but we often separate these out for composability reasons. Another reason could be that the <Grandchild /> component is a generic component used in many other places, and you want to keep its code as clean as possible.
Slot Props
Slot props allow you to pass data from the slot destination back up to the slot source. Most examples you find will look something like this:
<!-- Parent.svelte -->
<Child>
  <div slot="theSlot" let:name>
    Hello {name}!
  </slot>
</Child>

<!-- Child.svelte -->
<script>
  let name = 'Bob Smith'
</script>

<slot name="theSlot" name={name} />
In the above example, the prop name from the child component is rendered into the parent component. The let:name on the slot content in the parent component accesses the name property being set on the child slot.
What if you found yourself in a situation where you needed to utilize slot forwarding from a parent component to a grandchild component, but also needed to pass data from the grandchild back up to the parent? Most examples found around the internet show just forwarding slots through a wrapper slot to the slot in the child component (<Child /> and <Grandchild /> in our example above). Or they only show examples of slot props on a parent/child basis. But never both examples together. Turns out, we can still utilize slot props in this case, we just need to expand it out a bit.
The Use Case
While combining slot forwarding with slot props might not be that common of a need, it is one I recently came across and wanted to share. Here’s an example use case:
- You have an
<App />that renders multiple instances of a<Table> /. - A list of items is passed into each
<Table />instance that could vary in the type and/or amount of content displayed. - You have a
<Row />component that renders each item within the<Table />component. - Each
<Row />displays the variable content for each item. - Because the items between tables may differ, your
<Row />component may need to show additional content. - The additional content in our use case needs to be displayed in the form of a drop-down menu (AKA a select menu).
Ideally, you’d display the drop-down menu as part of an edit form that updates the data source, but for the sake of keeping things simple, we’ll just directly display it in the table row itself.
So how do we do this? One option might be to add some template logic where the extra content will render. If it sees a particular field or value come through, then it renders that particular condition. But what if you add another table with a different set of items to render that needs this extra content, but maybe this time it needs to display as a date picker. Or displayed as a text area. Or a checkbox. Or maybe…..
You get the point. Our template will become a mess of if/else template conditionals that won’t be very much fun to maintain on a larger codebase. One of our <Table /> instances needs to be able to pass a component or custom markup into a slot that renders in the <Row /> component, but also needs to render data. Because it’s going from <App /> to <Table /> to <Row />, we need to use slot forwarding with slot props.
Real World Example With Slot Forwarding
So let’s apply that pattern to our example use case by setting up an example application. We will start by just rendering two instances of a table that renders data in a table, where one of those tables uses slot forwarding to pass a component down to the table rows.
<!-- DropDown.svelte -->
<script>
  export let options;
  export let selectedId;
</script>

<div>
  <select
    id="option"
    name="option"
  >
    <option selected={!selectedId}>Choose an option</option>
    {#each options as option}
      <option value={option.id} selected={option.id === selectedId}>
        {option.name}
      </option>
    {/each}
  </select>
</div>

<!-- App.svelte -->
<script>
  import DropDown from './DropDown.svelte';
  import Table from './Table.svelte';

  const fruits = [{id: 1, name: 'Apple', preparationId: 10 }, {id: 2, name: 'Orange', preparationId: 10}, {id: 3, name: 'Banana', preparationId: 11}];
  const veggies = [{id: 4, name: 'Celery' }, {id: 5, name: 'Broccoli' }, {id: 6, name: 'Corn'}];
  const options = [{id: 10, name: 'Peeled'}, {id: 11, name: 'Frozen'}, {id: 12, name: 'Freeze-Dried'}];
</script>

<Table items={fruits} />

<Table items={veggies}>
  <div slot="extra-content-wrapper">
    <DropDown {options} />
  </div>
</Table>

<!-- Table.svelte -->
<script>
  import Row from './Row.svelte';

  export let items;
  export let headers;
</script>
<table>
  <thead>
    <tr>
      {#each headers as header}
        <th scope="col">{header}</th>
      {/each}
    </tr>
  </thead>
  <tbody>
    {#each items as rowItem}
      <Row {rowItem}>
        <slot
	  name="extra-content-wrapper"
	  slot="extra-content"
	/>
      </Row>
    {/each}
  </tbody>
</table>

<!-- Row.svelte -->
<script>
  export let rowItem;
</script>
<tr>
  <td>
    <div>
      {rowItem.id}
    </div>
  </td>
  <th scope="row">
    <div>
      <div>{rowItem.name}</div>
    </div>
  </th>
  {#if $$slots['extra-content']}
    <slot name="extra-content" />
  {/if}
</tr>
You can find a working REPL of this example at https://svelte.dev/repl/01012fff82334985874292ff208f550d?version=4.2.12
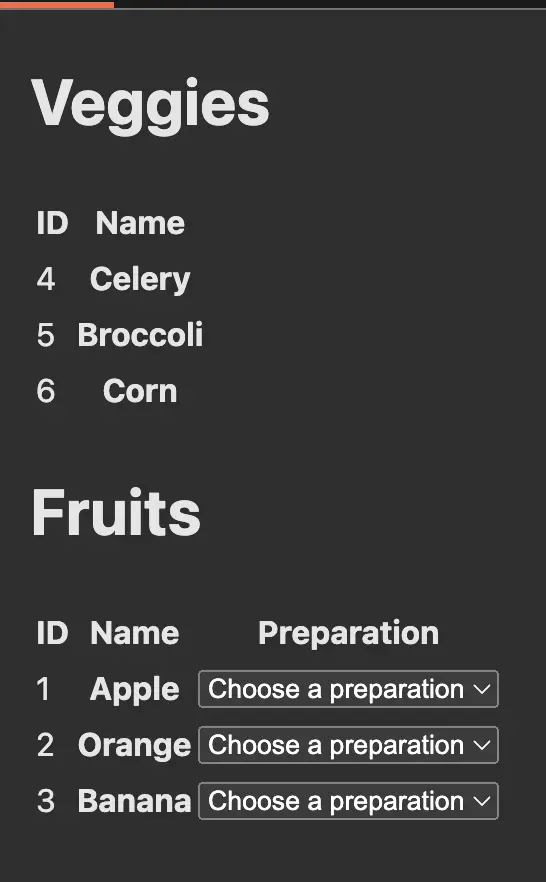
In our app above, just like in our slot forwarding example, we see that in <App />, we render a <Table />, where the second instance passes in a <DropDown /> component into the extra-content-wrapper slot. In the <Table /> component, we have our slot forwarding that passes the extra-content-wrapper slot data into the extra-content slot located in the <Row /> component.
One note on the slot names: You could keep the naming the same on all related slots (i.e. rename extra-content-wrapper to just extra-content). However, this might make things more confusing when trying to track down any bugs or errors, so keeping the names unique will help with that. It also helps you keep track of which direction the slotted content is moving.
Our end result shows that we now have a drop-down menu rendered in our second table instance which, if you expand the menus, shows the options passed into the <DropDown /> component.
This is great, and wasn’t too hard, right? But, this is a drop-down menu, and each of our fruits has a preparation option in the data. So what we actually want to do is preselect a menu option based on that data.
Applying Slot Props To Our Example
We know that we can pass data from the child component to the parent component through slot props, as seen in our slot props example above. But what you may not know is that you can have slot props on all slot instances that will send the data back up to the parent.
To accomplish this, we need to make updates to all of our slot instances. First, in our <Row /> component, we’ll update the <slot /> to make the item data available to the components that render in them:
{#if $$slots['extra-content']}
  <slot name="extra-content" item={rowItem} />
{/if}
The only change we made was to add item={rowItem} to the <slot />. Note: I’m using item and rowItem here, as opposed to using shorthand with similar names, to better illustrate how the data flows around.
In order to receive this item in the slot wrapper, we’ll make our second change to the slot within the <Table /> component:
<Row {rowItem}>
  <slot
    name="extra-content-wrapper"
    slot="extra-content"
    let:item
    {item}
  />
</Row>
We’ve added two lines to this <slot />:
let:itemis the mechanism that allows theitemproperty from the<slot />in the<Row />component to be accessed within the<slot />in the<Table />component.{item}is Svelte shorthand foritem={item}. This is the mechanism that takes theitemdata from the<Row />component and makes it available to the slot wrapper in our<App />component. If you look back at the<Row />component, this is the same change we made with theitem={rowItem}line we added. Only this time, we are using shorthand.
To make our third and final change, we’ll update the slot origin within the <App /> component with the following:
<div slot="extra-content-wrapper" let:item>
  <DropDown {options} selectedId={item.preparationId} />
</div>
Two updates were also made here:
- We added
let:itemto the<div>to allow accessing theitemdata passed to us from the wrapper slot in the<Table />component. This is the same modification we made to the<slot />in the<Table />component. - We are passing the
selectedIdprop into our<DropDown />component with the value ofitem.preparationId.
We could have passed the preparationId in from the <Row /> slot, but that now forces specific logic to reside in the <Row /> component that doesn’t really need to be there. In this case, it is better to keep it all in one place (in our case, <App />). If we ever needed to add another <Table /> instance, and instead render a date picker that utilized a property off of item, then we shouldn’t need to touch the <Row /> component at all in order to make that happen.
And, with those small changes, we now see the fruits of our labor:
Wrap Up
The final example looks like this:
<!-- DropDown.svelte -->
<script>
  export let options;
  export let selectedId;
</script>

<div>
  <select
    id="option"
    name="option"
  >
    <option selected={!selectedId}>Choose an option</option>
    {#each options as option}
      <option value={option.id} selected={option.id === selectedId}>
        {option.name}
      </option>
    {/each}
  </select>
</div>

<!-- App.svelte -->
<script>
  import DropDown from './DropDown.svelte';
  import Table from './Table.svelte';

  const fruits = [{id: 1, name: 'Apple', preparationId: 10 }, {id: 2, name: 'Orange', preparationId: 10}, {id: 3, name: 'Banana', preparationId: 11}];
  const veggies = [{id: 4, name: 'Celery' }, {id: 5, name: 'Broccoli' }, {id: 6, name: 'Corn'}];
  const options = [{id: 10, name: 'Peeled'}, {id: 11, name: 'Frozen'}, {id: 12, name: 'Freeze-Dried'}];
</script>

<Table items={fruits} />

<Table items={veggies}>
  <div slot="extra-content-wrapper" let:item>
    <DropDown {options} selectedId={item.preparationId} />
  </div>
</Table>

<!-- Table.svelte -->
<script>
  import Row from './Row.svelte';

  export let items;
  export let headers;
</script>
<table>
  <thead>
    <tr>
      {#each headers as header}
        <th scope="col">{header}</th>
      {/each}
    </tr>
  </thead>
  <tbody>
    {#each items as rowItem}
      <Row {rowItem}>
        <slot
	  name="extra-content-wrapper"
	  slot="extra-content"
          let:item
          {item}
	/>
      </Row>
    {/each}
  </tbody>
</table>

<!-- Row.svelte -->
<script>
  export let rowItem;
</script>
<tr>
  <td>
    <div>
      {rowItem.id}
    </div>
  </td>
  <th scope="row">
    <div>
      <div>{rowItem.name}</div>
    </div>
  </th>
  {#if $$slots['extra-content']}
    <slot name="extra-content" item={rowItem} />
  {/if}
</tr>
A REPL of the final changes is available here: https://svelte.dev/repl/a329962b546a4f6eb80d38c0fe3a3cb6?version=4.2.12
As you can see, combining slot forwarding with slot props is fairly simple and easy, but just not something that you would think you could do. Hopefully, this helps you out if you ever find yourself in a similar situation. Happy coding!
