

Introduction
In one of my previous posts, Semantic Search with Phoenix, Axon, and Elastic, I described a solution for integrating machine-learning-based vector search into your existing applications using Elasticsearch.
While Elasticsearch is a powerful tool for full-text search, its vector-search support is much newer and lacks the features of dedicated vector-search tools. Most notably, Elasticsearch does not support GPU-based similarity search. GPU-based algorithms can often be orders of magnitude faster than their CPU counterparts. Additionally, Elasticsearch dense-vector indices offer less control and fewer features than other vector index libraries, which can hinder your ability to build similarity search applications at scale.
Faiss which stands for (F)acebook (AI) (S)imilarity (S)earch, is a library “for efficient similarity search and clustering of dense vectors.” Faiss offers extensive customization of indices, as well as GPU-based algorithms, and has been proven to work at scales of 1 trillion vectors. Faiss natively supports Python and C++, but now you can take advantage of Faiss in Elixir with ExFaiss.
What is Vector Search?
Vector search is a type of search built on Approximate Nearest Neighbors (ANN) algorithms that find candidate vectors nearest to query vectors in some search space. Most often the vectors in a vector search are a machine-learning-derived, embedded representation of unstructured inputs such as text or images.
A typical vector search workflow looks something like this (credit Elastic):
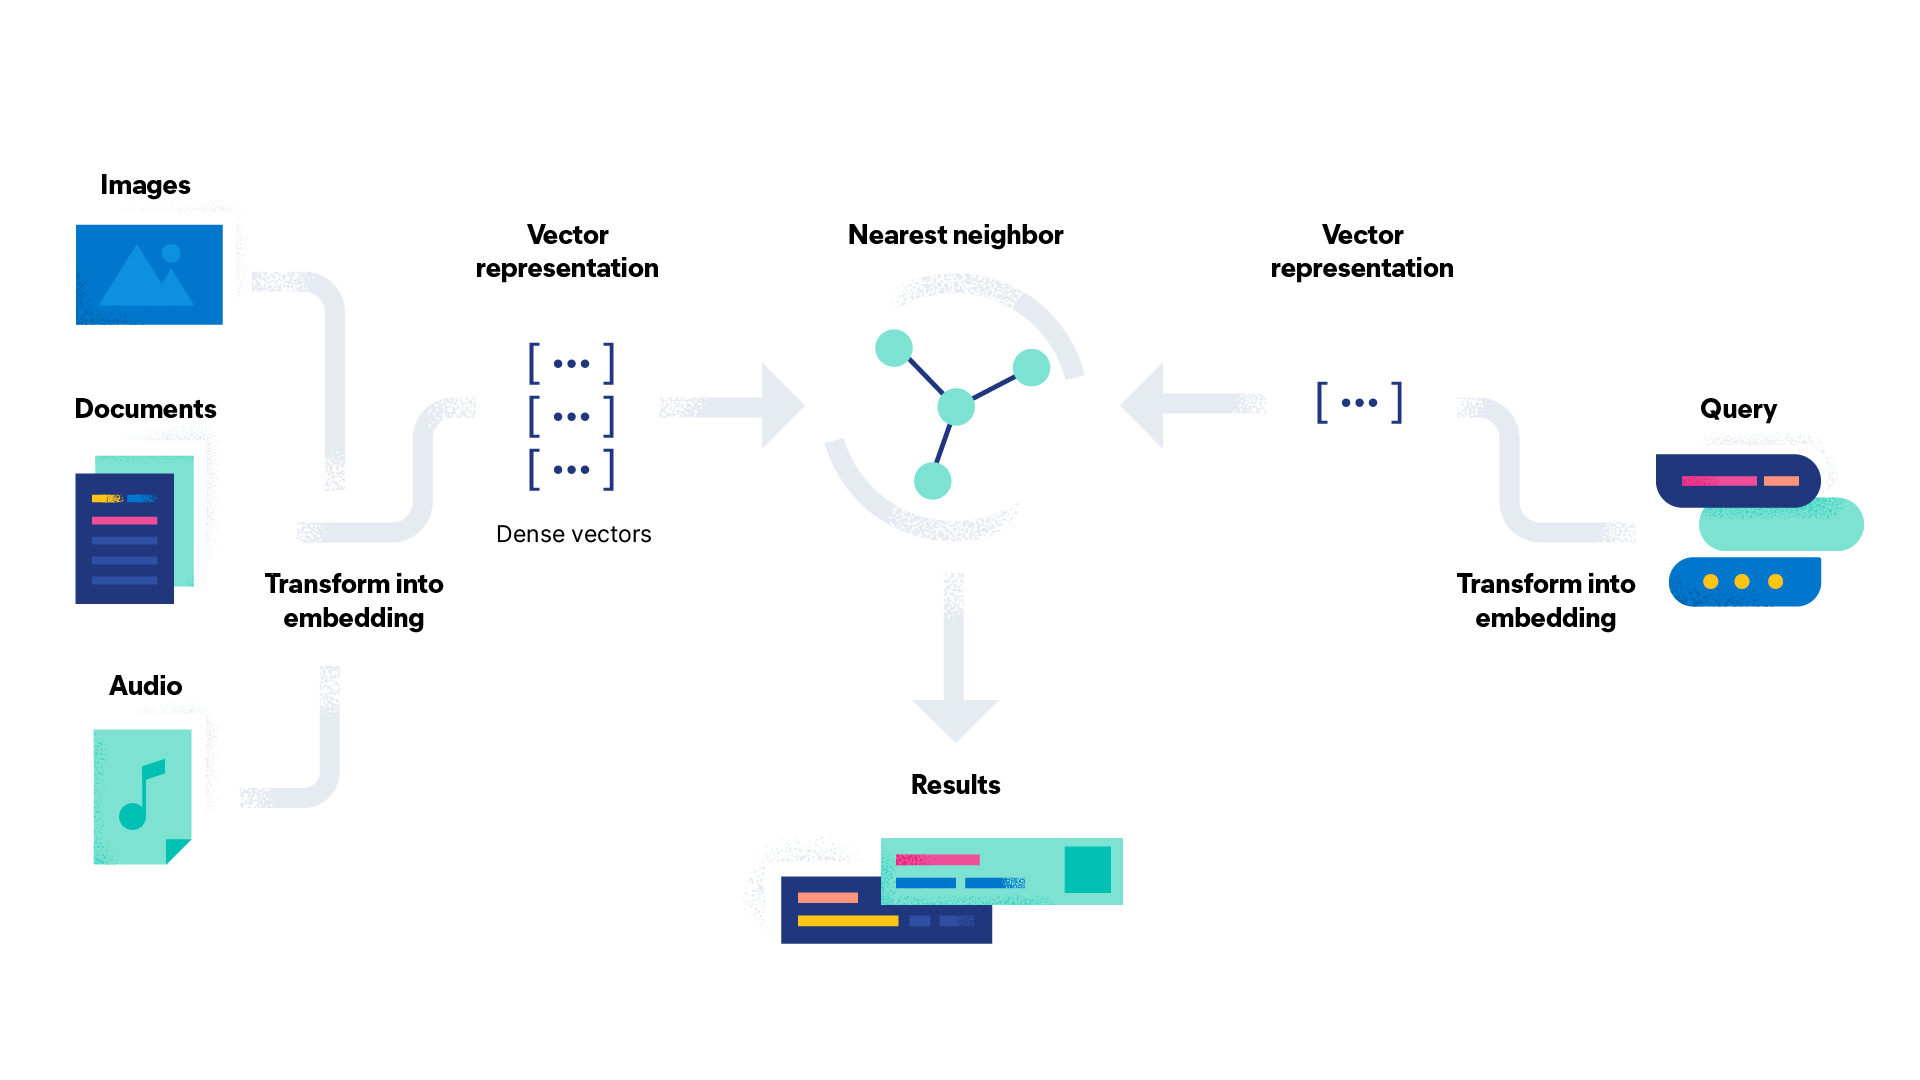
Vector search assumes you have a model that suitably embeds an unstructured input into a structured vector representation, where similar unstructured inputs would also map to similarly structured vectors. Mathematically speaking, “similar” just means vectors lie close together in space. You can kind of think of embedding models as generalizations of classification models; however, rather than trying to map an input to a discrete output label, embedding models attempt to map inputs to a unique, high-dimensional, and continuous representation.
Visually speaking, classification problems slice up the output space into discrete buckets. Imagine a model that classifies images of various animals. One bucket represents cats, one bucket represents dogs, another represents birds, and so on. If you were doing this process manually, you would likely have a pile of images for each animal.
Now, imagine that you wanted to break the process up even further–not only do you want to classify animals, but you also want to classify breeds within animal classes. Your dog bucket gets further divided into various breeds like Golden Retriever, German Shepherd, and more–as do all your other buckets. Visually you now have a smaller bucket within a larger bucket that represents breeds.
You can continue this process of dissecting buckets into even smaller buckets based on any number of animal features until you have a unique “bucket” for each image in your dataset. If you assign a label or value to each bucket, you end up with a unique encoding that represents each image. This representation maps to some point in space, where animals with more similar features are closer together (in many of the same buckets), and others are farther apart.
With suitable embedded representations, you can use an algorithm to determine which vectors are most similar (i.e. closest in space). With small indices, you can compute a distance metric (such as L1 or L2 norm) from a query vector to every other vector in the index and return the top k candidate vectors with the smallest distance metric.
But for large indices, this kind of brute-force search isn’t possible. Instead, you need to rely on Approximate Nearest Neighbor (ANN) algorithms to efficiently prune the search space and return a “best guess” at which candidate vectors are closest to a query vector.
With the rise of Transformer models, vector search is becoming more powerful, and more popular. Transformer models rely on representation learning and work well with multiple modalities. With transformers, it’s easy to extract a valuable representation from any type of data. Combined with vector search tools, you can rapidly build applications with integrated machine-learning-powered search and retrieval.
Vector Search with ExFaiss
ExFaiss is an Elixir library that interfaces with Facebook’s Faiss. ExFaiss is a relatively low-level wrapper around Faiss that makes it possible to create and use Faiss resources from Elixir. Faiss (and ExFaiss by design) are not full-featured vector databases, but are instead frameworks for creating and using vector indices. You can read a little more about the distinction in this article from Pinecone.
What this means is that ExFaiss is intentionally slim, and makes no assumptions about your intended use of the library. Production use cases will have a number of additional infrastructure requirements. I will discuss some deployment considerations later on in this post.
Before starting, you’ll want to fire up a Livebook and install the following dependencies:
Mix.install([
  {:ex_faiss, path: "elixir-nx/ex_faiss,
  {:nx, "~> 0.4"},
  {:exla, "~> 0.4"}
])
==> ex_faiss
make: '/home/sean/.cache/mix/installs/elixir-1.15.0-dev-erts-13.0.4/fa333a13bd85942bd7ed9d07a396ad43/_build/dev/lib/ex_faiss/priv/libex_faiss.so' is up to date.
Compiling 1 file (.ex)
:ok
Creating an Index
The fundamental object in Faiss is the index object, which encapsulates a vector index. Faiss actually supports a wide range of index types with fine-grained customization options. In ExFaiss, you can create an index using ExFaiss.Index.new/3:
index = ExFaiss.Index.new(512, "Flat")
%ExFaiss.Index{dim: 512, ref: #Reference<0.3614244527.2391146505.202990>, device: :host}
ExFaiss.Index.new/3 creates a new vector index with the given dimensionality and description. The description is a string that matches the spec described in The index factory. You can find out more about the different types of indices and modifiers from there. The Flat index is the most basic kind of index. It just performs a brute force search. When building your application, you should read through Guidelines to choose an index to determine which index works for you.
The dimensionality of an index just indicates what the size of each of the vectors in the index must be. In this case, each vector must have a dimensionality of 512. ExFaiss.Index.new/3 also takes options for modifying the index. For example, you can change the distance metric from the default :l2 to one of a number of supported metrics:
index = ExFaiss.Index.new(512, "Flat", metric: :l1)
%ExFaiss.Index{dim: 512, ref: #Reference<0.3614244527.2391146505.203005>, device: :host}
In addition to changing the metric, you can also change the device the index resides on. For example, if you have an Nvidia GPU and want to take advantage of GPU acceleration, you can pass device: :cuda:
index = ExFaiss.Index.new(512, "Flat", device: :cuda)
On first run, it may take some time to initialize a GPU index—this was an issue I ran into. If you just wait it out, eventually you’ll get an index back.
If you have multiple GPUs, you can target specific GPUs on your machine by passing a tuple:
index = ExFaiss.Index.new(512, "Flat", device: {:cuda, 1})
Faiss also supports transparent multi-device indices; however, this is not yet supported in ExFaiss.
Adding Vectors to an Index
After creating an index, you can add vectors in arbitrary batches. ExFaiss integrates directly with Nx, so you can add vectors using Nx tensors:
index = ExFaiss.Index.add(index, Nx.random_normal({512}))
%ExFaiss.Index{dim: 512, ref: #Reference<0.3614244527.2391146505.203005>, device: :host}
If you query the index for it’s current size, you’ll see you now have 1 vector in the index:
ExFaiss.Index.get_num_vectors(index)
1
You can also add tensors to the index in batches, which will typically be more efficient than adding one vector at a time:
index = ExFaiss.Index.add(index, Nx.random_normal({32, 512}))
%ExFaiss.Index{dim: 512, ref: #Reference<0.3614244527.2391146505.203005>, device: :host}
Now your index will have 33 vectors:
ExFaiss.Index.get_num_vectors(index)
33
ExFaiss.Index.add/2 requires your tensor to have a rank of 1 or 2, with the final dimension being equal to the number of dimensions specified in your index. Additionally, all vectors must have a type of {:f, 32}. If your tensor doesn’t meet these requirements, ExFaiss will raise:
ExFaiss.Index.add(index, Nx.random_normal({128}))
ExFaiss.Index.add(index, Nx.iota({512}))
Note that while each call to ExFaiss.Index.add/2 returns a new index struct, the underlying reference is immutable. That means successive calls will modify the same index struct:
ExFaiss.Index.add(index, Nx.random_normal({32, 512}))
%ExFaiss.Index{dim: 512, ref: #Reference<0.3614244527.2391146505.203005>, device: :host}
Even though I haven’t reassigned index, the contents of the underlying index have changed:
ExFaiss.Index.get_num_vectors(index)
65
Searching an Index
With a populated index, you can query the index with 1 or more query vectors to find the top k vectors closest to your query vectors using ExFaiss.Index.search/3:
query = Nx.random_normal({512})

ExFaiss.Index.search(index, query, 5)
%{
  distances: #Nx.Tensor<
    f32[1][5]
    [
      [539.4435424804688, 541.6113891601562, 544.9053344726562, 557.1708374023438, 557.5189819335938]
    ]
  >,
  labels: #Nx.Tensor<
    s64[1][5]
    [
      [38, 3, 2, 39, 37]
    ]
  >
}
ExFaiss.Index.search/3 returns a map with keys :distances and :labels. :distances is a vector of size {batch, k} where batch is equal to the number of query vectors and k is equal to the k specified in the search. k indicates the number of candidate vectors that should return from the search. :distances represents the distance of each returned vector from the corresponding query vector according to the distance metric you specified when creating the index. :labels are integer labels for each of the candidate vectors in your index. By default :labels are assigned in sequential, increasing order.
If you’re using ExFaiss in conjunction with a structured database like Postgres, it might be more convenient for you to map these labels directly to Postgres primary keys. Faiss supports indices with user-provided integer IDs. All you need to do is create a new index with IDMap modifier:
index = ExFaiss.Index.new(128, "IDMap,Flat")
%ExFaiss.Index{dim: 128, ref: #Reference<0.3614244527.2391146500.201520>, device: :host}
Then you can use ExFaiss.Index.add_with_ids/3 to pass both vectors and integer IDs to the index:
index = ExFaiss.Index.add_with_ids(index, Nx.random_normal({5, 128}), Nx.tensor([1, 5, 7, 9, 11]))
%ExFaiss.Index{dim: 128, ref: #Reference<0.3614244527.2391146500.201520>, device: :host}
Now when you search, your labels will map directly to the IDs you specified when adding vectors to your index:
ExFaiss.Index.search(index, Nx.random_normal({128}), 2)
%{
  distances: #Nx.Tensor<
    f32[1][2]
    [
      [250.86492919921875, 260.0044860839844]
    ]
  >,
  labels: #Nx.Tensor<
    s64[1][2]
    [
      [9, 7]
    ]
  >
}
Training an Index
Most of the indices you’ll work with require training. This means that you must provide a “representative sample” of input data to train the index before you can query it. You can do this with ExFaiss.Index.train/3:
index =
  ExFaiss.Index.new(10, "HNSW,Flat")
  |> ExFaiss.Index.train(Nx.random_normal({100, 10}))
  |> ExFaiss.Index.add(Nx.random_normal({100, 10}))

ExFaiss.Index.search(index, Nx.random_normal({10}), 3)
%{
  distances: #Nx.Tensor<
    f32[1][3]
    [
      [4.295245170593262, 5.3970627784729, 6.233855247497559]
    ]
  >,
  labels: #Nx.Tensor<
    s64[1][3]
    [
      [63, 11, 62]
    ]
  >
}
Persistence
ExFaiss indices are stored in-memory; however, you can persist them to disk and reload them from disk using ExFaiss.Index.to_file/from_file:
:ok = ExFaiss.Index.to_file(index, "index.bin")
index = ExFaiss.Index.from_file("index.bin", 0)
%ExFaiss.Index{dim: 10, ref: #Reference<0.3614244527.2391146529.201916>, device: nil}
You can then search and use the index as normal:
ExFaiss.Index.search(index, Nx.random_normal({10}), 3)
%{
  distances: #Nx.Tensor<
    f32[1][3]
    [
      [2.422379493713379, 4.168035507202148, 4.876709938049316]
    ]
  >,
  labels: #Nx.Tensor<
    s64[1][3]
    [
      [82, 71, 73]
    ]
  >
}
Clustering with ExFaiss
In addition to similarity search, Faiss supports efficient clustering of dense vectors. Clustering is the process of grouping data in an unsupervised manner (e.g. without needing access to labels). If you know nothing else about a dataset, you can use clustering to get access to groups of similar data in the dataset.
For example, if you have a dataset that represents customer behavior on your website, you can use clustering to gain insights to the “types” of users you have (e.g. browsers or purchasers).
Clusterings in ExFaiss are created with ExFaiss.Clustering.new/3:
clustering = ExFaiss.Clustering.new(128, 10)
%ExFaiss.Clustering{
  ref: #Reference<0.3614244527.2391146520.201358>,
  k: 10,
  index: %ExFaiss.Index{dim: 128, ref: #Reference<0.3614244527.2391146500.201547>, device: :host},
  trained?: nil
}
Then, you can train the cluster on your dataset:
clustering = ExFaiss.Clustering.train(clustering, Nx.random_normal({400, 128}))
%ExFaiss.Clustering{
  ref: #Reference<0.3614244527.2391146520.201358>,
  k: 10,
  index: %ExFaiss.Index{dim: 128, ref: #Reference<0.3614244527.2391146500.201547>, device: :host},
  trained?: true
}
Finally, you can query the clustering for specific cluster assignments for data points:
ExFaiss.Clustering.get_cluster_assignment(clustering, Nx.random_normal({128}))
%{
  distances: #Nx.Tensor<
    f32[1][1]
    [
      [107.08744812011719]
    ]
  >,
  labels: #Nx.Tensor<
    s64[1][1]
    [
      [8]
    ]
  >
}
:distances indicates the distance of your query vector from the centroid of the cluster, and :labels is the cluster label. Under the hood, clustering actually maintains an index with k vectors where k is the number of clusters you specified when creating the cluster:
ExFaiss.Index.get_num_vectors(clustering.index)
10
You can also get the centroids of the clustering:
ExFaiss.Clustering.get_centroids(clustering)
#Nx.Tensor<
  f32[10][128]
  [
    [0.023990295827388763, 0.15066096186637878, 0.21808193624019623, 0.142413929104805, 0.18317341804504395, -0.07162952423095703, 0.3815433084964752, -0.16259776055812836, -0.43733739852905273, 0.11409493535757065, -0.14631769061088562, 0.2587531805038452, 0.11657790839672089, -0.12204591184854507, 0.09586010128259659, 0.0476464107632637, 0.13613013923168182, 0.3184964656829834, 0.05925193801522255, -0.060553018003702164, -0.10446067899465561, -0.06084907427430153, 0.4304802119731903, 0.2743024230003357, -0.12481584399938583, -0.10227929800748825, -0.06651915609836578, 0.11950135976076126, -0.12169258296489716, -0.13921332359313965, -0.14966388046741486, 0.28956955671310425, 0.12099193781614304, 0.023360300809144974, -0.2539049983024597, -0.25003859400749207, -0.45176732540130615, 0.17149312794208527, 0.1296563446521759, 0.10130268335342407, 0.214811772108078, -0.29942402243614197, -0.3588094115257263, 0.20960432291030884, 0.18304313719272614, 0.4666171967983246, -0.060203924775123596, 0.32712119817733765, -0.05794418603181839, 0.3709704875946045, ...],
    ...
  ]
>
ExFaiss in Your Applications
There are many considerations you should keep in mind when integrating ExFaiss into your application. These are just a few:
-
Faiss (and as a result ExFaiss) doesn’t support indexing of non-vector data like text, usernames, etc. It’s likely you’ll need to combine ExFaiss with a relational database like Postgres for most legitimate applications. Vector databases like Milvus provide a good reference for the features necessary for building production-ready vector-search applications.
-
ExFaiss also does not automatically persist indices. If your application crashes, and you don’t explicitly back up your indices to disk, you will lose all of the data associated with an index. Fortunately, with Elixir, it’s easy enough to write jobs that continuously back up your indices.
-
ExFaiss indices on both CPU and GPU are not thread-safe for mutable operations such as training and adding values to the index. On the GPU, none of the operations in an ExFaiss indices is thread-safe.
-
It’s faster to search in batches rather than for single query vectors at a time. You’ll want to consider using dynamic batching to ensure overlapping requests get queued for searching at the same time.
-
Depending on your setup, ExFaiss might compete for resources with other computationally expensive models (like neural network inference). You’ll want to avoid launching these computations in parallel or launching multiple searches in parallel. Fortunately, the benefit of using ExFaiss in conjunction with Axon is that you have fine-grained control over how requests in your search application get handled in batches.
Conclusion
I hope this post served as a good introduction to vector search and ExFaiss. There are numerous applications of machine-learning-based similarity search in the real world–and now you can build ML-powered search applications entirely in Elixir.
In my next post, we’ll rework the example in my previous post on search to make use of ExFaiss, LiveView, and some other exciting new libraries in the Elixir machine learning ecosystem.
